This is just a stripe design! get a TON of shades of blue and get a white and black. You will probably need thin tipped brushes. Choose one to be your base coat and paint it on. Then just make stripes! You can overlap and do anything you want. Paint each of your little toes with a shade of blue on each.
Questions or comments? Email us at friends4evanails@gmail.com and you can also send us your designs! thanks:) Subscribe!
Saturday, August 25, 2012
Ocean Toes
Thursday, August 9, 2012
Purple, Gray and Blue
This is really easy to do but hard to explain... So take a thin brushed black and make a diagonal line across your big toe. Make another one right next to it, far enough away that it makes a thick line for the purple. DON'T fill it in yet with purple! Above your thick line paint with a baby blue color. Below the line is gray.
Now paint your purple and when it dries paint sparkles on it!
Next make a diagonal line the same way you did on your big toe but only one, not two. Above paint purple, below is gray. On the next nail above.is blue, below is gray. Keep repeating this pattern. There you go!
Comment, share, and subscribe! If you do this design or have a suggestion of what you think we should do please email us at friends4evanails@gmail.com! thanks:)
Sunday, July 22, 2012
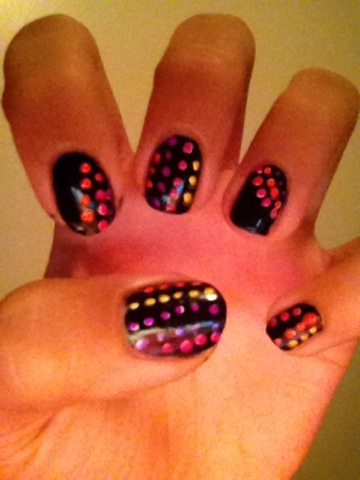
Colored Disco Dots;)
Pick 4 or 5 colors that you like and paint each row of dots different colors. The reason you paint white underneath is to make the color brighter on the black.
Enjoy:)
Email us your design at friends4evanails@gmail.com!
Saturday, July 21, 2012
Disney Mickey Mouse Nails!
*Use L.A. Nails Art Deco Polish for the Mickey Mouse.
Find a pink that looks fairytale-ish:) and apply 2 coats to each nail, next on your thumb make a half circle on the top of your nail(see pic). Fill it in black, then make 2 circles for the ears and fill them in black too. On your ring finger make a circle in the middle, then 2 circles on top to make ears. Paint the pink nails with glitter, then only put glitter on the Mickeys. :) Your done!
Questions or Comments? Maybe you tried one of our designs and want it to be on the blog? Email friends4evanails@gmail.com!
<3
Tuesday, July 10, 2012
Modern French Tipped Ring Finger:)
Paint all your nails one color. Next all you do is take a different color and on your ring finger paint a straight line across the top! Pretty easy right? And super cute too!:)
Sally Hansen Real Nail Polish Strips
ATTENTION!! This will save you A TON of time! For about $10.00 you can press these on and they'll be there for about a week! They look fabulous right?
Tropical Sunset Gradient ☀
Make sure to send in your designs to friends4evanails@gmail.com! We would love to see your comments. As well!
**Reviews coming up soon!**
Thursday, July 5, 2012
July 4th Mani
Make sure to show us your designs at friends4evanails@gmail.com to be featured in our Gallery! Please comment and share! <3
Sunday, July 1, 2012
4th of July
These are really easy! Here's what you need: Sponge, white, red, blue, glitter!
Paint all your nails except for your ring finger with a couple coats of glitter. You need a paper towel to use now. On the picture below it shows to paint blue and then red underneath, then dab the sponge in it. Dab it on your nail next. And if its not dark enough just keep sponging it on. Paint 1 coat of glitter over that.
Now your done! Have a great 4th of July!
Don't forget to share, comment, and follow! Send in your designs at friends4evanails@gmail.com!
Thursday, June 28, 2012
Our second send in!
Special thanks to Morgan for sending this in. Its another version of our design, Zebra Nails. Great job!
If you wanna do what Morgan did, send in your version of our original to friends4evanails@gmail.com!
Our first send in!
My friend Megan sent us in her version of our Zebra Nails and here's how they turned out! Thanks Megan!
If you want to do what she did, email friends4evanails@gmail.com!
Water Marble Without Water
Hey! This is an easy design but you just have to do it right. This is the first time i did it so its not very good..
So here's what you need...
-3 colors
-white
-toothpick
What you do first is paint your nails white. Don't let them dry!!
Paint 3 diagonal really thick lines of each color on your nail. Start in the corner of your nail and with the toothpick drag it in a diagonal line. Repeat this multiple times. Make sure all the colors blend. If they don't look right, take a paper towel and since it's wet, you can just wipe it off and start over. Don't clean the toothpick after each line. If you have trouble there is some really good videos on how to do this!
if you try this design share it with us at friends4evanails@gmail.com! it could be featured in our gallery!
Sunday, June 24, 2012
Zebra Nails!
Wednesday, June 20, 2012
Confetti PARTY!
These nails are SO easy its unbelievable. You don't even have to worry about being symmetrical with your left and right hand!
First paint your nails white. Down below i have pictures of the materials i used. So you will need a makeup sponge, or really any kind of sponge.
Paint some pink on the corner of your sponge and dab it on paper to get the excess off. Sponge it onto your nail just in random spots. Keep doing that to all your nails.
Use a bunch of colors! Repeat each color the same way you did with the pink.
If you dont want to use the same colors i did, use whatever you want!
Sparkles are optional;)
Saturday, June 16, 2012
Galaxy Nails
Paint your nails with the base coat and when they aren't quite dry but they aren't really wet, kinda sticky, take your makeup sponge and paint some green on the corner. To get the excess paint off the sponge dab it on some paper towel. Next, take the makeup sponge and sponge on the green in a thin coat on your nail. Do the same with the pink and blue. If one of the colors overlaps too much to the point where you can't see the color underneath repeat the color you can't see. After that paint glitter on top! It looks so cool, right??
Make sure to share, comment and follow! Email us your version of this design at friends4evanails@gmail.com and your picture could be in our gallery!
Friday, June 15, 2012
Modern French Tips
Make sure to share this link, comment, and follow! Also, if you try this design, show us how it turned out at friends4evanails@gmail.com and you could be mentioned in our Gallery! <3
Thursday, June 14, 2012
Water Marble!
Colors I used were:
Sinful Colors- Black on Black
Sinful Colors- Snow Me White
Sally Hansen- InstaDri Anti-Chip Topcoat
Make sure to share this link, comment, and follow! Also, if you try this design, show us how it turned out at friends4evanails@gmail.com and you could be mentioned in our Gallery! <3
Triangles!!▲
Colors I used were:
Sinful Colors- Black on Black
Sinful Colors- 24/7
Sinful Colors- Innocent
Sinful Colors- Savage
Sinful Colors- Unicorn
Sally Hansen- InstaDri Anti Chip Top Coat
Make sure to share this link, comment, and follow! Also, if you try this design, show us how it turned out at friends4evanails@gmail.com and you could be mentioned in our Gallery! <3
Tuesday, June 12, 2012
Pink with Polka Dots
Make sure to comment and follow! Email us your version of this design at friends4evanails@gmail.com and you could be in our gallery! Thanks<3
Saturday, May 26, 2012
Love Scrabble Nails!
If you try this design show us how it turned out at friendsforevanails@gmail.com. Don't forget to follow, share and comment!! Thanks!
Monday, May 21, 2012
Square Blob Nails
Hey! For this design you need a thin brushed black and a thin brushed pink,purple,green and yellow. And a regular black.
So first just paint your nails black. I wasn't really sure what design to do the other day so i just painted two random lines and i was like well i can make a square! So i made a big square on the left hand side of my finger. Then i left a little black space(and if there is none is your thin black brush to make some.) and made a smaller square directly next to the big square. So you should have a big square then a little one next to it. Next you make a smaller square underneath the first big square but keep space between them. Next to that make a bigger square under the 2nd smaller square. Make sure to leave space between them, but not to much!
Make sure to share, comment and follow! If you try this design show us how it turned out a friends4evanail@gmail.com and you could be mentioned in or gallery!
Saturday, May 19, 2012
Magazine Nails
Here's what you do to get newspaper or magazine nails!
Get magazine clippings or newspaper with words or designs on them.
You need rubbing alcohol and white or lightly colored polish.
Paint your nail a light color then dip them in rubbing alcohol.
Press and hold the magazine clipping for about 30 seconds on your nails. After that paint top coat on and your done!!
If you try this design show is how it turned out at friends4evanails@gmail.com and you could be mentioned in our gallery!
Thursday, May 17, 2012
TMNT Ninja Turtles!!
Hey, so first paint your nails green. Then use a thin black brush to write TMNT on your nails. One letter per nail. And dont do your thumb!
Choose a color that can be your mask. Draw a thick line horizontaly across your nail. Then make eyes and your done!:)
If you try this design, show us how it turned out at friends4evanails@gmail.com and you could be mentioned in our gallery!!
Saturday, May 12, 2012
Plaid nails!
Allow the white to dry!
Colors I used were...
L.A.Colors Nail Art Deco-Intense Pink
L.A.Colors Nail Art Deco-Yellow
L.A.Colors Nail Art Deco-Bright Green
Make sure to comment,share and follow!! If you try this design show us how it turned out at friends4evanails@gmail.com and you could be mentioned in our gallery!
Wednesday, May 9, 2012
Polka Dot Nails w/ Jewels
Colors I used were:
Sinful Colors-
L.A. Colors Art Deco- Black
L.A. Colors Art Deco- Intense Pink
Sally Hansen- Insta-Dri Anti Chip Top Coat
Kiss- Precision Nail Glue
Make sure to share this link, comment, and follow! Also, if you try this design, show us how it turned out at friends4evanails@gmail.com and you could be mentioned in our Gallery! <3
Saturday, May 5, 2012
Tape Nails:) - I don't have a better name:) sorry...
Hi! Materials you need for this are...
-Tape
-3 colors that go good with each other
-Black polish
-Scissors
Ok, So first paint your nails using the 3 colors...Like stripes on your nails using the colors randomly. Allow time to dry..Next, Put tape on your nail making a criss cross or anything that you want. Paint over the tape with black now. Take the tape off immediately and it should look something like my nails!
Colors i used were...
OPI-Black
Claire's-Neon Green
Sinful Colors-Neon Pink
China Glaze-Aqua Blue
Make sure to share this link, comment, and follow! Also, if you try this design, show us how it turned out at friends4evanails@gmail.com and you could be mentioned in our Gallery!
Monday, April 30, 2012
Flower Nails
Don't forget top coat!
Colors I used were...
Nicole by OPI Pink
L.A. Colors Nail Art Deco White and Neon Pink:)
If you try this design show us how it turned out at friends4evanails@gmail.com and you could be mentioned in our gallery!
Saturday, April 28, 2012
Rainbow Leopard Nails <3
Sinful Colors- Forget Now
Sinful Colors- Midnight Blue
Sinful Colors- Courtney Orange
Sinful Colors- Let's Talk
Sinful Colors- San Francisco
Then, I used lighter colors and just made random splotches with:
Sinful Colors- 24/7
Claire's- Secret Garden
Sinful Colors- Unicorn
Claire's- Tiger Lily
Sinful Colors- Innocent
Then I used a Kiss Nail Artist Fine Art Pen in Black to make lines around the splotches and create smaller dots to fill in empty spaces. And, always remember to apply a top coat! I used Sally Hansen Insta-Dri Anti-Chip Top Coat.
Make sure to share this link, comment, and follow! Also, if you try this design, show us how it turned out at friends4evanails@gmail.com and you could be mentioned in our Gallery!
Ladybugs!!
Hey! So first you need to paint your nails red. Then paint black French tips at the top of each nail. Paint a black line down the middle. Make dots on each side of the line. Make eyes at the top and your done!
Colors i used were-
Revlon Red
L.A. Colors Nail Art Deco Black&White
Make sure to share,comment and follow! If you try any of these designs you can email your picture to friends4evanails@gmail.com!
Your nails could be in our gallery!!:)
Thanks!
Monday, April 23, 2012
Colorful Animal Spots
Repeat for each nail then take a different nail polish color and fill in the oval things. Use a different color for each oval.
I used China Glaze-White
L.A. Nail Art Deco-a different color for each shape,remember!
Please share,comment,and follow! If you do this design send it to friends4evanails@gmail.com and you could be featured in our gallery!!
Peace/French Tips-Really Cute for little girls!
Colors I used were- Pure Ice- Celestial and-L.A. Colors Nail Art Deco- Black
Share,comment and follow! If you do this design take a picture and send it in to friends4evanails@gmail.com, if it's good it could be featured on our gallery!
Sinful Colors Nail Polish
Sunday, April 22, 2012
L.A. Colors Art Deco Nail Polish
At Dollar General for $1!!
Perfect for small and delicate designs because of its fine tipped brush. Tons of amazing colors too!
Tips:)
Time Saver- Sally Hansen's Complete Salon Manicure on Angel Wings is an all-in-one polish base, top coat, and nail strengthener, $7
Go Blue- Ditch safe neutral colors for an out-of-the-box color such as Essie Barbados Blue!! $8
Breathe Deeply- Revlon Scents of Summer enamel in Cotton Candy smells just like the sugar treat! $5
Sparkle- This sensational silver, Nicole by OPI's Wink Of Twink, is part of the Nicole collection at Walmart! $8
Long Lasting- LO'real Paris Pro Manicure in Innocence keeps color contact for up to 7 days! $5
Fast Drying!!- OPI Rapid Dry helps quicken the process of drying! Usually it takes forever to dry but with this product the process gets sped up! And don't forget to try Sally Hansen Salon Effects Real Nail Polish Strips! $8.50
Saturday, April 21, 2012
Penguin Pals
P.S. Be careful when using darker colors, you may have to add an extra coat for the penguin body ( as I soon found out after I made the purple ones).
Colors I used were:
Sinful Colors- Let's Talk
Sinful Colors- Midnight Blue
Sinful Colors- Cloud 9
L.A. Colors Art Deco- White
L.A. Colors Art Deco- Black
Sally Hansen- Insta-Dri Anti Chip Top Coat
Make sure to share this link, comment, and follow! Also, if you try this design, show us how it turned out at friends4evanails@gmail.com and you could be mentioned in our Gallery! <3