Sunday, July 22, 2012

Colored Disco Dots;)

Hey! Make sure you have a steady hand for this design. Take a black and paint all of your nails with that color. Allow time to dry. Next, take a white thin brush and paint vertical dots on your nail. You can do it in whatever arrangement or pattern you want, but try to make all your dots the same size.

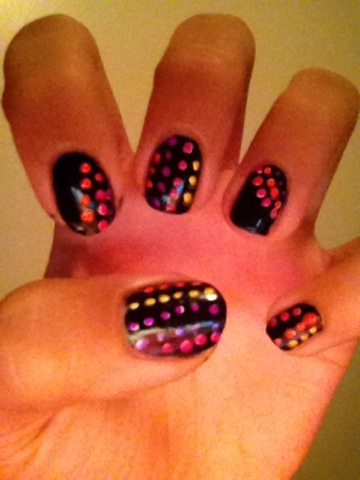
Pick 4 or 5 colors that you like and paint each row of dots different colors. The reason you paint white underneath is to make the color brighter on the black.
Enjoy:)
Email us your design at friends4evanails@gmail.com!

Saturday, July 21, 2012

Disney Mickey Mouse Nails!

*Use L.A. Nails Art Deco Polish for the Mickey Mouse.

Find a pink that looks fairytale-ish:) and apply 2 coats to each nail, next on your thumb make a half circle on the top of your nail(see pic). Fill it in black, then make 2 circles for the ears and fill them in black too. On your ring finger make a circle in the middle, then 2 circles on top to make ears. Paint the pink nails with glitter, then only put glitter on the Mickeys. :) Your done!

Questions or Comments? Maybe you tried one of our designs and want it to be on the blog? Email friends4evanails@gmail.com!
<3


Tuesday, July 10, 2012

Modern French Tipped Ring Finger:)

Paint all your nails one color. Next all you do is take a different color and on your ring finger paint a straight line across the top! Pretty easy right? And super cute too!:)


Sally Hansen Real Nail Polish Strips

ATTENTION!! This will save you A TON of time! For about $10.00 you can press these on and they'll be there for about a week! They look fabulous right?


Tropical Sunset Gradient ☀

This is a gradient nail tutorial. First, I used a base coat and Sinful Colors' Snow Me White. Then, I applied Sinful Colors' Citrine and Let's Meet, BB Couture's Adios Mo Fo, and L.A. Colors' Phenomena to a makeup sponge and sponged onto my nails. Once they were dry, I took L.A. Colors Art Deco in Black and created a blob going from the base of my nail to the tip. Fill it in. Draw a line from the blob going up and stopping a little past the middle of your nail. To create the "leaves" make small arched lines. For the birds, small 'V' shapes. When dry, add a small amount of shimmer for the "sand" by adding Sinful Colors' Kissy. Add a top coat and DONE! Hope you enjoyed this design!

Make sure to send in your designs to friends4evanails@gmail.com! We would love to see your comments. As well!
**Reviews coming up soon!**

Thursday, July 5, 2012

July 4th Mani

So it's a little late (oops!), but here are my nails for this week. It was pretty simple. First I used 2 coats of Sinful Colors Snow Me White. Then I took Pure Ice French Kiss and Siren, and began making dots along the tips. For the shooting stars, I made an upside down 'Y' shape with a line going across horizontally. Then, I added 5 dots in an arched line. That's it! Don't forget to apply a base coat and top coat! Hope you had a good holiday! :)

Make sure to show us your designs at friends4evanails@gmail.com to be featured in our Gallery! Please comment and share! <3

Sunday, July 1, 2012

4th of July

These are really easy! Here's what you need: Sponge, white, red, blue, glitter!

Paint all your nails except for your ring finger with a couple coats of glitter. You need a paper towel to use now. On the picture below it shows to paint blue and then red underneath, then dab the sponge in it. Dab it on your nail next. And if its not dark enough just keep sponging it on. Paint 1 coat of glitter over that.

Now your done! Have a great 4th of July!

Don't forget to share, comment, and follow! Send in your designs at friends4evanails@gmail.com!